
Detecting Water Heater Issues Before They Escalate
Learn to spot early warning signs of a failing water heater—from odd noises to temperature swings—so you can prevent major damage and cold showers.
PLUMBING
3/22/20258 min read

What This Post Covers
How water heaters typically function and why they fail
Common red flags: discoloration, inconsistent temperatures, strange sounds
Basic DIY checks and minor fixes
Tips for preventative maintenance
When to call a pro for more complex issues
Support from SuperTech Industries for long-term water heater care
Why Early Detection Matters
Few home appliances work as hard behind the scenes as a water heater. Day in and day out, it provides your household with hot water for showers, dishwashing, and laundry—often without a second thought. That’s precisely why a sudden failure can feel so disruptive: no one wants to wake up to a freezing shower or discover soaked floors from a leaking tank. Thankfully, these issues rarely appear out of nowhere. Water heaters typically exhibit warning signs in the days, weeks, or even months before a catastrophic breakdown. By recognizing these subtle clues—like strange noises, off-color water, or reduced heating capacity—you can address minor problems early and prevent higher repair costs or more extensive water damage.
Proactive attention extends a heater’s lifespan and saves energy. A small patch of rust, for example, may reveal a failing anode rod that, if replaced now, prevents internal tank corrosion. Similarly, unusual popping sounds might point to mineral sediment buildup that compromises efficiency. Left unchecked, these symptoms can escalate until the only solution is an expensive replacement. Adopting a routine of inspection and light maintenance ensures you’re rarely caught off-guard by a complete heater meltdown.
How Water Heaters Function—And Why They Fail
To spot the signs of trouble, it helps to understand the fundamentals. A standard tank-type water heater—whether gas or electric—holds water inside an insulated steel tank. When the thermostat senses a dip below the set temperature, it activates the heating mechanism: a gas burner below the tank or electric elements within the water. The tank remains pressurized, ensuring hot water flows out quickly when a faucet opens.
Common Reasons for Failure
Corrosion: Over time, metal components in contact with water can corrode, especially if the anode rod (designed to absorb corrosive elements) is neglected.
Mineral Buildup: Hard water leaves sediment at the tank’s bottom. This layer forces the heater to work harder or unevenly heats the tank.
Faulty Heating Elements or Gas Burners: Electric elements can burn out, while gas burners may suffer from clogs or misalignment.
High Pressure or Temperature: Excessively high thermostat settings or poor tank relief can strain the tank.
Age: Most traditional tank heaters last about 8–12 years. As they near the end of this range, internal wear accumulates.
Being aware of these failure points helps interpret early signs. For instance, if you consistently flush sediment yet still hear popping noises, it might be time to inspect for advanced corrosion. Or if the burner repeatedly fails to ignite, you could be dealing with venting issues or gas pressure irregularities.
Common Warning Signs and Their Causes
Inconsistent or Insufficient Hot Water
A once-reliable heater that now struggles to maintain temperature is often the first symptom homeowners notice.
Possible Issues:
Excessive Sediment: Layers of minerals collect at the tank’s bottom. When elements try to heat water through that buildup, efficiency drops, and water might not reach its usual temperature.
Aging or Failing Components: Electric heaters have upper and lower heating elements; if one fails, total hot water capacity shrinks. Gas units rely on burners that can degrade or become partially obstructed.
Thermostat Miscalibration: Thermostats can drift from the set temperature, causing lukewarm or overly hot water.
DIY Checks:
Thermostat Setting: Confirm it remains around 120°F—enough for comfort while minimizing scald risk and reducing energy usage.
Tank Flush: Draining a few gallons from the bottom can remove sediment clumps. If water flows cloudy or gritty, you have a sediment problem that flushing might fix.
Element or Burner Exam: If an electric heating element is caked in limescale, it transfers heat poorly. If a gas burner has yellowish flames rather than blue, adjust or clean it.
Discolored or Rusty Water
That unpleasant moment when you draw a bath and the water appears faintly brown or rust-tinged:
Likely Causes:
Internal Rust: The steel tank, once the anode rod has worn out, may corrode from within.
Rusted Dip Tube: The tube that channels cold water into the tank can degrade, shedding flakes.
Pipe Corrosion: In older homes, corroded pipes can taint hot (and sometimes cold) water.
DIY Checks:
Compare Taps: If only hot water is rusty, focus on the heater. If both hot and cold have discoloration, look at the home’s main supply lines.
Inspect the Anode Rod: A heavily eaten-away rod can no longer protect the tank. Replacing this rod often resolves mild rust infiltration.
Flush: Pulling a few gallons to examine sediment or rusty flakes can confirm internal corrosion.
Strange Noises—Popping, Knocking, or Banging
These audible cues typically mean the heating process interacts with sediment or trapped pockets of water:
Why It Happens: Over time, minerals like calcium settle at the bottom, especially in areas with hard water. The heater produces steam bubbles beneath these deposits, creating popping or knocking. Gas burners might “rumble” if heat distribution is unevenly blocked.
Solutions:
Routine Tank Flush: Removing sediment can silence minor noise. If persistent after multiple attempts, scaling may be extensive, making a professional assessment prudent.
Check Burner Alignment (in gas models): Misaligned burners can cause flame rollout or incomplete combustion, contributing to rumbling.
Assess Water Softening Needs: In extreme hard-water regions, a softener or more frequent flush might be beneficial.
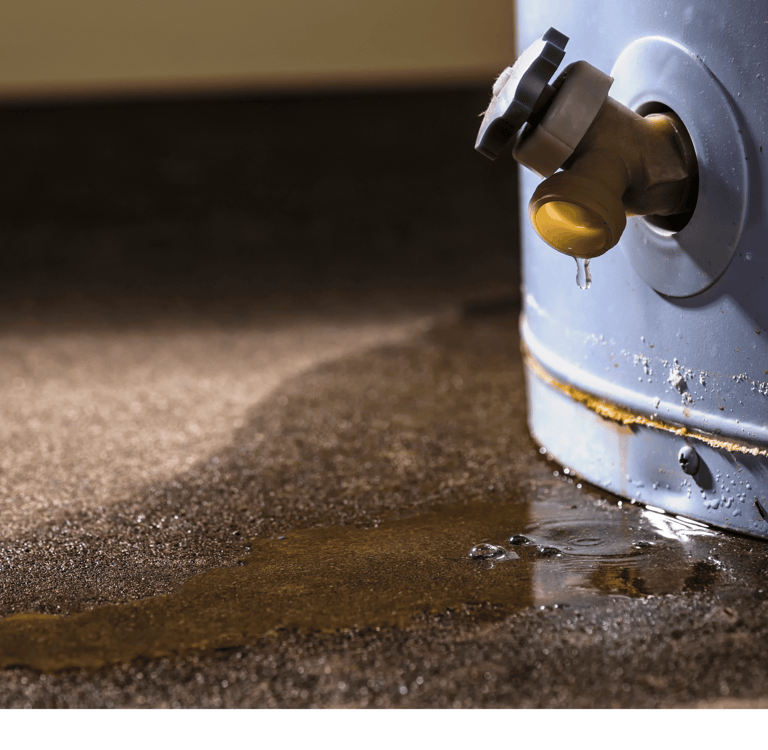
Dampness or Leaks Around the Unit
Even the smallest drip around the heater should prompt immediate attention:
Potential Problems:
Loose Fittings: Inlet or outlet connections can loosen over time, especially with thermal expansion.
Leaky Drain Valve: The valve used for flushing can develop a worn seal, leading to minor seepage.
Cracked Tank: A more serious situation that likely calls for replacement, as tank cracks aren’t typically repairable.
DIY Checks:
Identify the Source: Wipe suspected areas with paper towels to see if water reappears.
Tighten Connections: Gently snug the drain valve or pipe fittings. Over-tightening can strip threads or worsen cracks.
Monitor Over 24 Hours: If drips continue, escalate to a professional. Hidden internal tank leaks can quickly become catastrophic floods.
Fluctuating Water Temperatures or Overheating
Sudden bursts of very hot or scalding water point to possible thermostat malfunctions or temperature sensor issues. Gas models might experience irregular gas flow or a misfiring burner.
Common Causes:
Broken Thermostat: If the control is stuck or misread, it may heat water beyond safe levels.
Mineral-Caked Heating Elements: Electric elements coated in limescale generate heat sporadically.
Gas Burner Issues: A clogged burner or faulty gas valve can result in uneven combustion, causing peaks and valleys in water temps.
How to Respond:
Thermostat Check: If adjusting the dial or digital setting doesn’t stabilize temperature, consider replacing or recalibrating it.
Inspect Flame Quality: In gas units, a consistent blue flame with minimal yellow tips is ideal. Rust or debris can hamper the burner’s function.
Basic DIY Checks and Maintenance
Flush the Tank Periodically
How-To:
Turn off the power (electric switch or gas valve) and let the water cool to avoid burns.
Connect a garden hose to the drain valve at the bottom.
Drain several gallons into a bucket or outside area until sediment clears.
Why It Helps: Minimizes buildup that hinders heat transfer, reduces popping noises, and extends the heater’s life.
Inspect the Anode Rod
Purpose: The anode rod protects the tank from corrosion by sacrificing itself.
Replacement Interval: About every 3–5 years, or more frequently in areas with very hard water.
Warning Signs: If the rod is heavily pitted, corroded, or reduced to a thin wire, swap it out to stave off internal tank rust.
Adjust Temperature Settings
Default Recommendation: Around 120°F balances comfort with energy savings and scald prevention.
Pipe Insulation: If the water takes ages to heat up at certain faucets, insulating hot-water lines can reduce standing heat loss and speed up delivery.
Test the T&P Relief Valve
What It Does: The Temperature & Pressure (T&P) relief valve prevents dangerous pressure or temperature buildup inside the tank.
Simple Test: Gently lift its handle to let a small amount of water flow out; ensure it reseals without dripping excessively. A stuck or leaky T&P valve can be hazardous, warranting immediate attention or a new valve.
When to Call a Professional
Substantial Leak or Tank Damage
A cracked tank or advanced internal rust typically means the water heater is at the end of its life. Attempting to repair a corroded tank rarely works long-term, so professional replacement is safer.
Recurring Pilot/Burner Problems (Gas Models)
If the pilot light constantly goes out or the burner flame remains weak and yellow, it could indicate venting issues, gas pressure inconsistencies, or a failing gas valve—situations that require specialized tools and know-how.
Advanced Electric Element or Wiring Issues
Frequent tripped breakers or visible scorching on wires might suggest deeper electrical faults. A trained electrician or HVAC specialist should diagnose these problems to avoid potential electrocution or fire.
Persistent Noise Despite Flushing
Occasional sediment can be cleared, but if banging or knocking remains severe, the interior walls might have thick scaling. Professional de-scaling or a possible replacement ensures the tank doesn’t sustain permanent damage.
Major Hard Water Scaling
Areas with extremely high mineral content need more than standard flushing. From specialized anode rods (like aluminum/zinc combos) to whole-home water softeners, professional guidance can implement a longer-term fix.
Realistic Example of Early Detection
Picture a homeowner noticing a faint knocking every time they use hot water. Initially, it’s easy to dismiss because the water heater still outputs plenty of heat. Yet after a week or two, the noise grows louder and intermittent rust flakes appear in the bathtub. By performing a simple drain-and-flush, the homeowner expels a significant amount of sediment. With the anode rod showing wear, they replace it. The noise subsides, hot water remains consistent, and the small rust flakes disappear. Had they delayed or ignored these signals, a costly tank replacement or major leak might have been inevitable.
Extra Tips for Proactive Maintenance
Check Plumbing Joints: Inspect adjacent hot and cold lines for corrosion or leaks. Sometimes the water heater’s inlet/outlet connections are the weak link.
Ventilation (Gas Heaters): Ensure the vent pipe is clear and that air intake areas aren’t obstructed. Poor combustion airflow can damage a burner or cause carbon monoxide issues.
Plan for Replacement: If your tank is approaching 10–12 years, weigh whether a proactive upgrade to a more efficient heater (maybe tankless) is worth it before a failure forces an urgent replacement.
Set Reminders: Schedule an annual check or every six months if water conditions are harsh. Just a quick flush or anode rod inspection can reveal issues early.
Tank Heaters vs. Tankless: Troubleshooting Differences
While tank-style units dominate many homes, tankless (on-demand) heaters require a somewhat different diagnostic approach. Instead of worrying about sediment at the bottom, tankless units often face scale in internal heat exchangers. Reduced flow rates, error codes indicating insufficient water supply, or fluctuating outlet temperatures can flag partial clogs. If you own or consider a tankless model, regularly descaling the heat exchanger and verifying adequate gas pressure (or electrical supply) become essential to avoid uneven heating or system lockouts.
That said, the basic concept of early detection remains consistent. Whether it’s an unexpected temperature drop, a suspicious noise, or a small leak near your tankless mounting area, addressing it promptly prevents stress on other components and prolongs operational efficiency.
Partnering with SuperTech Industries
When tasks or findings exceed your comfort level, professional intervention avoids guesswork and potential hazards. SuperTech Industries supports everything from minor part replacements to a full diagnostic work-up. Our services cover:
Inspections & Flushing: We’ll remove sediment, check the T&P valve, and evaluate the burner or elements for safe operation.
Anode Rod Replacement: A relatively quick job that drastically extends your tank’s lifespan.
Gas Valve & Burner Repairs: Gas flow issues need expert eyes for safe corrections.
Electric Element & Wiring Fixes: We handle advanced electrical troubleshooting to ensure stable heating performance.
Tank & Tankless Upgrades: If your existing heater is too old or damaged, we’ll guide you toward an energy-saving replacement—be it an ultra-efficient tank or a modern tankless system.
“Don’t just call a tech, call a supertech.” With Simple Solutions. Superior Results. as our mantra, you can expect top-notch service and clear explanations, every step of the way.
Wrapping Up for Consistent Hot Water
Catching water heater troubles early is a matter of vigilance. Over time, even robust heaters succumb to corrosion, mineral buildup, or worn electrical and gas components. By knowing the warning signs—such as inconsistent heating, rust-tinted hot water, unexplained noises, or small leaks—you can swiftly intervene with basic DIY measures like tank flushing or anode rod checks. These short tasks often fend off bigger, costlier problems down the line.
Still, some issues call for a more thorough professional approach, especially if you discover cracks in the tank, persistent burner faults, or chronic mineral scaling beyond a simple flush. In those cases, scheduling an assessment with SuperTech Industries saves you stress, money, and the potential mess of a total heater breakdown. After all, few inconveniences equal starting a busy morning without reliable hot water—or, worse yet, dealing with a flooded utility room. By pairing routine maintenance with timely repairs, you ensure your household’s water heating remains stable, efficient, and ready to serve for years to come.
SuperTech Industries
Your trusted partner for all your solutions.
KNOWLEDGEABLE - AFFORDABLE - ADAPTABLE - DEPENDABLE
© 2024. All rights reserved.
1530 E Williams Field Road
Ste. 201
Gilbert, AZ 85295


ROC 361165
Licensed - Bonded - insured