
Simple Drywall Repairs: Fixing Holes and Cracks
Learn easy patching methods for drywall holes and cracks. Discover tools, techniques, and tips for a smooth, professional finish—no massive renovation required.
HANDYMAN
3/23/20259 min read
Simple Drywall Repairs: Fixing Holes and Cracks
Meta Title: Simple Drywall Repairs: Fixing Holes and Cracks | SuperTech Industries
Meta Description: Learn easy patching methods for drywall holes and cracks. Discover tools, techniques, and tips for a smooth, professional finish—no massive renovation required.
What This Post Covers
Common causes of drywall damage and why simple repairs matter
Tools and materials for fixing everything from nail holes to larger fractures
Step-by-step instructions for preparing, patching, and finishing damaged drywall
Tips on blending textures and handling tricky spots (corners, seams)
Safety considerations and cost-saving strategies
When to call a pro if the job escalates
Support from SuperTech Industries for more extensive renovations
Why Drywall Repairs Matter
Drywall is the backbone of modern interior walls—durable enough for daily wear yet simple to customize. But over time, everyday mishaps (think: moving furniture, hanging decorations, or rowdy kids) can leave your once-pristine walls dotted with holes, cracks, and dents. Although these blemishes may not seem urgent, ignoring them can lead to bigger headaches down the road. Small cracks can spread, water damage can hide behind even a minor hole, and structural weaknesses might worsen if left unchecked.
Repairing drywall is often easier than people realize. A modest set of tools, the right patch materials, and some attention to detail can make the difference between a botched fix and a seamless wall that looks professionally done. Plus, patches and paint are far less expensive than full replacements. In this post, we’ll explore methods tailored to typical drywall issues—from tiny nail holes to larger gashes—so you can tackle them with confidence. And if you ever need more complex or large-scale solutions, SuperTech Industries is here to help you keep your home looking its best.
Common Causes of Drywall Damage
Accidental Impact: Doors swung open too wide or furniture scraping the wall can quickly lead to dents or small holes.
Nail and Screw Holes: Remnants from artwork or shelving often leave behind small punctures. Over time, a home can accumulate dozens of these once décor is rearranged.
Settlement Cracks: Houses expand and contract with temperature and humidity, resulting in fine cracks at corners, joints, or seams over time.
Moisture Problems: Water intrusion from leaks or high humidity can cause drywall to swell, sag, or crumble.
DIY Electrical and Plumbing Work: Opening walls for wiring or pipe repairs might leave unpatched cutouts.
No matter the source, addressing these issues early helps maintain the structural integrity of walls and keeps your home looking fresh. If a small hole can turn into a crack or, worse, let pests or moisture in, you’ll save time and money by nipping it in the bud.
Essential Tools and Materials
Most drywall fixes require a straightforward lineup of tools, many of which are inexpensive or easy to rent:
Utility Knife: For trimming loose paper edges or scraping away protrusions.
Putty Knives: A 2-inch or 4-inch putty knife for small patches, plus a wider 6-inch or 8-inch knife for feathering out compound.
Drywall Compound: Usually all-purpose joint compound (also called mud) or a lightweight spackle for shallow holes.
Mesh or Paper Tape: Helps reinforce joints and cracks. Self-adhesive mesh tape is especially handy for small repairs.
Drywall Patches: Prefabricated metal or mesh patches, ideal for quickly covering holes 2 to 6 inches wide without cutting new drywall.
Sandpaper or Sanding Block: Usually medium-fine grit (120–220) to smooth dried compound.
Dust Mask/Goggles: Sanding compound or old drywall can kick up fine dust.
Stud Finder: If the damage is near studs or corner beads, verifying structure location can help anchor repairs.
Primer and Paint: Matching the wall’s existing color or applying a fresh coat finishes the repair discreetly.
Optional but helpful extras:
Corner/Angle Trowel: Handy for corners, giving crisp edges.
Spray Texture (if matching specific finishes): For walls with stipple, knockdown, or popcorn textures.
Step-by-Step: Fixing Small Holes and Nail Pops
Identifying Small Holes
These usually range from the diameter of a nail up to around a half-inch. Examples include nail pops from drywall screws backing out or small anchor holes left behind by shelving. The solutions are typically quick:
Remove Loose Material: Gently scrape or cut away any frayed drywall paper.
Fill with Compound or Spackle: Use a small putty knife to press filler into the hole. Keep the surface slightly proud (above the wall level) to allow for sanding.
Dry and Sand: Once the compound hardens, lightly sand with 120- to 180-grit until smooth. Don’t oversand or you may expose the hole again.
Second Coat if Needed: Larger nail holes may require a second pass of compound. Sand again carefully.
Prime and Paint: A coat of primer helps the patch blend with the final paint color.
Tip: For nail pops, try removing or resetting the nail deeper into a stud, then follow the steps above. If screws keep popping, it may signal a deeper issue like shifting studs or inferior drywall anchors.
Handling Medium Holes (1–3 Inches)
Using Self-Adhesive Patches
If your hole is too large to fill with compound alone (over an inch wide but under about 3 inches), consider a mesh or metal patch:
Clear and Level the Edges: If the hole’s edges protrude or are ragged, trim them.
Apply the Patch: Many come with adhesive backing. Center it over the hole, pressing firmly so it sticks smoothly.
Compound Layers: Spread joint compound across the patch, feathering the edges 2–3 inches beyond the patch perimeter. Let it dry fully.
Light Sanding: Use fine-grit paper to smooth ridges.
Optional Second Layer: Another coat may be needed if you see the mesh pattern or if edges are visible. Feathery transitions minimize lumps.
Prime and Paint: Match the original wall color or repaint the whole area if you want a uniform look.
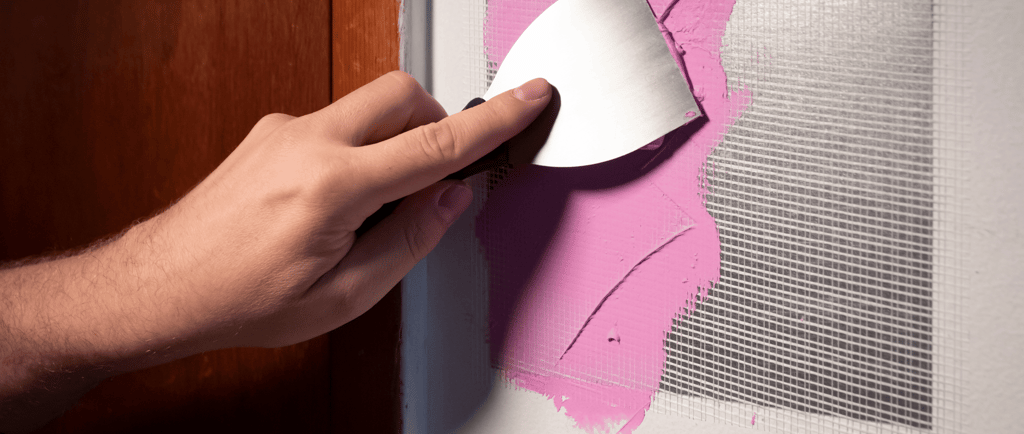
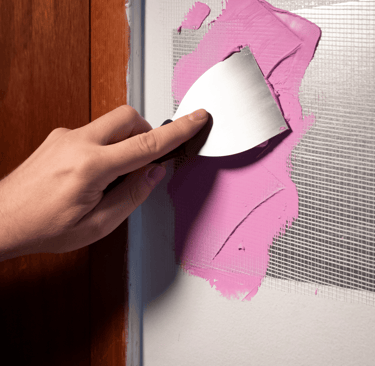
Larger Holes (3–6 Inches) and Basic Drywall Cutouts
Inserting a New Drywall Piece
When an opening exceeds 3–4 inches, a simple patch might not hold firmly. Alternatively, cutting a fresh piece of drywall is more secure:
Square Off the Hole: Trim the damaged area into a neat rectangle or square. Keep edges flush and free of loose paper.
Create a Backing Support: Screw a thin piece of scrap wood or plywood behind the hole so you have something to anchor the new drywall piece onto. A 1×3 or paint stirrer can work if it’s big enough.
Measure and Cut the Patch: Match the thickness (usually ½ inch for interior walls). Cut a piece to fit snugly.
Attach the Patch: Screw or secure it to the backing support, making sure the patch surface aligns with the wall.
Tape and Mud: Cover seams with paper or mesh tape, then apply the first coat of compound. Spread beyond the tape’s edges.
Sand and Repeat: A second or third coat might be necessary, each time fanning out the compound further to blend.
Finishing: Sand carefully, prime the patch, and follow with a matching paint color.
Tip: For corners or edges, corner beading or angle tape may be required to keep lines straight and durable.
Repairing Cracks and Seams
Settlement and Hairline Cracks
Thin cracks may appear near corners, door frames, or where ceilings meet walls. Typically:
V-Cut the Crack: Use a utility knife to slightly open the hairline crack, creating a wider channel for compound.
Embed Tape: Lay a strip of mesh or paper tape over the crack.
Mud Over It: Smooth joint compound across the tape. After it dries, sand lightly and reapply if you still see the tape’s texture.
Feathering: Extend the mud out 4–6 inches on each side to blend.
Tip: If a crack reappears repeatedly, suspect structural shifts or moisture issues. Investigate the root cause rather than just re-patching.
Dealing with Texture Matching
Some walls aren’t just smooth. Popcorn, knockdown, orange peel, or swirl textures can complicate a patch. If you skip matching texture, the repair stands out.
Small Texture Kits: Many hardware stores carry spray cans mimicking common textures like orange peel or knockdown. Practice on a cardboard sheet before applying to the wall.
Knockdown: Spray or dab joint compound with a brush or sponge, then flatten gently with a wide knife. The key is timing—don’t knock it down too soon or too late.
Popcorn: This older style can be tricky. Some kits have aerosol canisters that shoot out foam-like bits. Alternatively, manual sponges or specialized rollers replicate the popcorn effect, but results can vary.
Blend Edges: Overlap new texture onto the existing area so the boundary disappears.
Tip: If your patch is fairly small, you may get away with approximating the texture. However, for large repairs or bigger areas, it might be best to retexture the entire wall/ceiling section for consistency.
Safety and Cost-Saving Measures
Safety Reminders
Dust and Debris: Drywall compound dust is fine and easily inhaled. Wear a dust mask or respirator and use drop cloths to contain mess.
Utility Lines: When cutting into walls, confirm you’re not near electrical wiring or plumbing with a stud finder or circuit tracer.
Stepladders: For overhead patches, keep a stable ladder and avoid overstretching.
Cost-Saving Tips
Buy in Bulk: If you have multiple holes, a larger bucket of compound may be cheaper than multiple small spackle tubs.
Rent Tools: Items like power sanders or specialized taping tools can be rented if you won’t use them often.
Practice on Scraps: If you’re uncertain about applying compound or texture, grab a piece of scrap drywall to experiment on.
Check Leftover Paint: If you still have your original wall color, using that can avoid buying new paint gallons. Just ensure it’s still good (unexpired and well-mixed).
Knowing When to Call a Pro
Most drywall holes or cracks can be handled with a weekend of DIY dedication. However, certain situations may require professional assistance:
Extensive Water Damage: If an entire corner or large sections of drywall show signs of mold, rot, or structural compromise, professional evaluation ensures safety and proper remediation.
Huge Holes or Ceiling Damage: Large overhead repairs can be physically challenging and require more advanced finishing techniques.
Cracks That Keep Returning: Recurrent splits may signal foundation settling or bigger structural shifts. Merely patching the drywall won’t fix the underlying problem.
Complex Texturing: Matching elaborate swirl or popcorn textures on big sections is challenging. A pro can replicate finishes seamlessly.
In such cases, SuperTech Industries stands ready with the expertise and “Simple Solutions. Superior Results.” approach—making sure your wall repairs integrate with the overall structure while saving you from repeated patching attempts.
Example Scenario: A Medium-Sized Hole in a Living Room Wall
Assess the Damage: The hole is about 4 inches across, from moving furniture carelessly.
Square It Off: Use a drywall saw to create a clean, rectangular opening.
Install a Support: Slip a piece of 1×2 behind the opening, screwing it onto the existing drywall edges.
Cut a Patch: From scrap drywall matching the thickness, cut a rectangle to fit snugly. Attach it to the support.
Tape and Mud: Apply mesh tape around the perimeter. Spread joint compound in a wide feather pattern. Let dry, sand, and repeat until smooth.
Prime and Paint: After final sanding, prime so the patch doesn’t absorb paint differently than the surrounding wall, then paint for a seamless look.
With this process, an eyesore can vanish in just a couple of days (accounting for compound drying times). The total cost is minimal—some compound, tape, leftover paint—and the result looks professional.
Maintenance Mindset for Future Prevention
Use Bumpers or Doorstops: Protect walls behind frequently opened doors.
Mount Artwork Smartly: Anchors rated for the load avoid unnecessary big holes or repeated attempts that leave multiple holes.
Inspect After Storms or Leaks: Even minor water infiltration can weaken drywall. Spotting these early means smaller patches.
Record Paint Colors/Sheens: Keep notes on brand, color name/code, and finish. Matching paint on future repairs is much easier with these details.
A well-kept home typically sees fewer costly repairs. Drywall is no exception—by staying aware of minor cracks and dents, you keep your living spaces looking fresh and structurally sound.
How SuperTech Industries Can Help
If your drywall damage feels bigger than your comfort level—like large-scale cuts, compromised ceilings, or mold-affected areas—our team can handle it:
Extensive Patchwork: We smooth out entire sections or rooms for a unified finish.
Texturing and Finish Matching: Whether it’s a subtle orange peel, knockdown, or older popcorn patterns, we replicate the original texture.
Structural Considerations: If you suspect underlying water damage or framing issues, we’ll investigate and fix them at the source.
Renovation Projects: Merging drywall repairs with other home improvements (painting, trim carpentry, insulation enhancements) can yield an overall updated look.
“Don’t just call a tech, call a supertech.” Our approach, Simple Solutions. Superior Results., ensures your drywall repairs meet high standards. We not only fix damage but also blend it seamlessly into your home’s design. You won’t have to fight mismatched patches or worry about recurring cracks.
Wrapping Up
Drywall holes and cracks don’t have to mar your home’s beauty. Armed with basic tools—spackle, mesh patches, and a sturdy putty knife—you can repair everything from tiny nail punctures to bigger accidental openings. Focus on prepping the area, applying patch materials properly, and feathering compound so the finished surface remains smooth. Simple steps like priming and matching paint help the final patch blend perfectly.
For more extensive damage, advanced texturing needs, or persistent issues that keep reappearing, professional help is a smart investment. Experienced pros like SuperTech Industries ensure a streamlined job, leaving walls flawless and sturdy. Whether it’s a quick hole patch or a complete wall overhaul, consistent, well-executed repairs keep your home looking polished—and they shield your walls from further harm down the road.
SuperTech Industries
Your trusted partner for all your solutions.
KNOWLEDGEABLE - AFFORDABLE - ADAPTABLE - DEPENDABLE
© 2024. All rights reserved.
1530 E Williams Field Road
Ste. 201
Gilbert, AZ 85295


ROC 361165
Licensed - Bonded - insured