
Tiling Tips: Refreshing Your Kitchen Backsplash
Elevate your kitchen with a vibrant new backsplash. Learn essential tools, layout strategies, and step-by-step tiling tips for a polished, lasting finish.
3/25/20258 min read

What This Post Covers
Reasons to update your kitchen backsplash and how tiling rejuvenates the space
Preparation essentials for a smooth install (surface prep, layout, tile choice)
Step-by-step guidance for cutting, setting, and grouting tiles
Special considerations for corners, around appliances, and backsplashes exposed to moisture
Safety precautions and time-saving tricks
Maintenance best practices and final finishing touches
Support from SuperTech Industries for more complex renovations
Why a Fresh Backsplash Matters
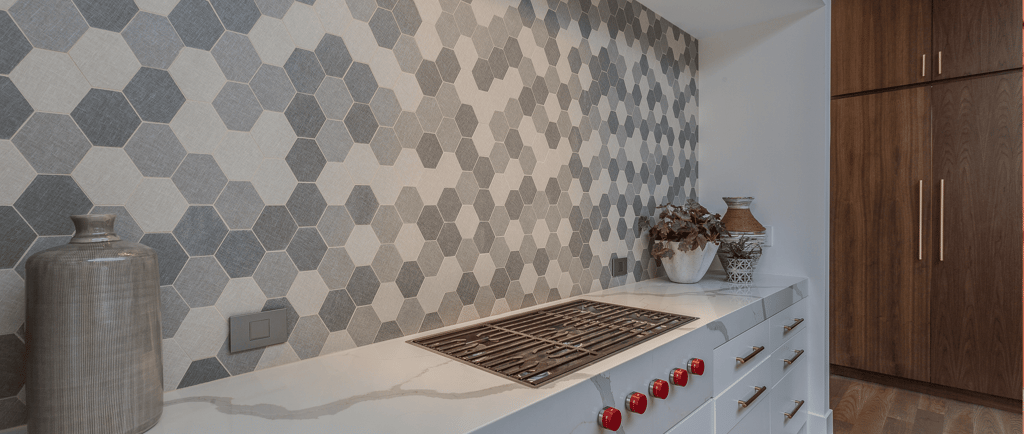
In many homes, the kitchen acts as a central gathering space—where meals are prepared, stories are shared, and daily life unfolds. A well-designed backsplash can serve as the visual anchor of the room, instantly adding color, texture, or pattern. Beyond looks, a backsplash protects the wall from splatters and moisture, making it easier to clean after cooking sessions. This balance of functionality and aesthetic potential makes tiling a direct way to refresh the heart of your home without an exhaustive (and expensive) remodel.
When properly installed, tile is durable, heat-resistant, and easy to maintain. Whether you choose timeless subway tile, intricate mosaic patterns, or large-format porcelain slabs, a new backsplash can elevate your kitchen’s entire vibe. But success hinges on thoughtful preparation. From measuring the area accurately to selecting adhesives that suit your tile type, a detailed plan prevents messy failures. Below, you’ll find comprehensive tips to ensure your tiling project yields professional-looking results—even if it’s your first time.
Gathering Tools and Materials
A key part of tiling success is having the right equipment on hand:
Tile and Grout: Choose materials suited to kitchens. Glazed ceramic or porcelain tiles handle moisture well and clean easily. For the grout, decide on sanded (for joints >1/8”) or unsanded (for narrower gaps).
Thin-Set Mortar or Mastic: Some kitchen backsplashes call for tile mastic (pre-mixed adhesive) or thin-set mortar (a powder mixed with water). The latter typically offers a stronger bond, but mastic can be more convenient if your tiles are small or it’s a straightforward install.
Tile Cutter or Wet Saw: A basic tile cutter suffices for straight cuts in ceramic or porcelain. A wet saw helps if you have tougher materials (like glass, stone, or porcelain larger format) or need more precision on angled cuts.
Notched Trowel: The size of the notches matters. For smaller wall tiles (like 3×6 subway tiles), a 3/16” or 1/4” notch might do. Larger tiles might need 1/4” × 3/8”.
Level and Spacers: A small torpedo level (or longer for bigger areas) ensures rows align horizontally. Spacers keep uniform joints—commonly 1/16”, 1/8”, or 3/16” wide.
Rubber Grout Float: Spreads and presses grout into the joints.
Sponge and Buckets: For cleaning excess grout, rinsing tools, or mixing mortar.
Measuring Tape, Pencil, Straightedge: For accurate layout lines and cut marks.
Protective Gear: Gloves, safety glasses (especially if cutting tile or using a wet saw).
Alongside these basics, some optional yet helpful items include tile nippers (for small notches around outlets), a corner trowel (if dealing with angled surfaces), and a hole saw designed for tile if you must create openings for plumbing or outlets.
Prepping the Surface
A successful backsplash installation relies on a flat, clean substrate. Tiling over bumpy walls or flaking paint invites trouble:
Clear and Degrease: Kitchens accumulate grease. Wash the area thoroughly with a mild degreaser. Even brand-new drywall can have dusty residue from sanding—wipe that off.
Remove Old Materials: If an existing tile or laminate backsplash is in place, remove it carefully. Scrape off leftover adhesive or lumps.
Repair Flaws: Patch any holes or dents in the drywall, letting filler dry fully. Sand the area level. Painted surfaces can remain if the paint is well-adhered (no peeling).
Prime if Necessary: Some recommend a light coat of primer or an appropriate sealer if the surface is especially porous or was previously wallpapered.
Mark Key Reference Lines: Use a level to pencil a horizontal line near the bottom row or along cabinets. This ensures your first tile course is perfectly straight. Sometimes, you may want to “dry fit” a row to see how far up it will extend behind overhead cabinets.
Tip: Double-check how the tile meets edges near corners, windows, or electrical outlets. Plan transitions with trim pieces or edging strips so you’re not stuck with awkward half-tiles in highly visible spots.
Choosing and Laying Out Your Tile Pattern
With so many tile styles—subway, mosaic sheets, geometric shapes—selecting an aesthetic can be fun but also overwhelming. Once you decide, consider:
Pattern Layout: Subway tiles often stagger joints by half a tile. Mosaics might form repeating patterns. If you have a feature area (behind the stove), you might install a decorative accent band.
Focal Points: If you have a central area you want to highlight—like behind a range hood—center your pattern there so cut tiles end up in less noticeable edges.
Mosaic or Sheet Tiles: Sheets can speed the process, but ensure your wall is level and you keep consistent spacing between sheets.
Dry-laying a small portion on a tabletop or the actual wall (without adhesive) clarifies how the pattern lines up, where cuts will occur, and whether your design seamlessly fits around outlets or corners.
Applying Tile Adhesive
Once everything is measured, it’s time to affix tiles to the wall. The approach differs slightly depending on your mortar or mastic, but general steps apply:
1. Mix or Prepare Adhesive
If using thin-set mortar, follow the product’s ratio of water and powder. Let it slake (rest) for a few minutes before final stirring.
Mastic arrives pre-mixed; just open and stir. Check the label for recommended tile sizes—mastic can struggle with heavier or larger tiles.
2. Spread Adhesive
Using a notched trowel of the correct size, spread a thin layer onto the wall. Hold the trowel at a ~45° angle to form uniform ridges.
Work in small, manageable sections—usually 2–3 square feet. If the adhesive skins over or dries before you set the tiles, you must reapply fresh adhesive.
3. Press Tiles into Place
Firmly push each tile into the ridges. Give a slight wiggle or twist to ensure contact.
Insert spacers along edges if the design requires uniform joints. Double-check tile alignment frequently with a level or straightedge.
If using mosaic sheets, ensure the sheets butt together smoothly. Trim edges of the mesh if the spacing or alignment gets off.
4. Clean Off Excess
After a few rows, gently wipe off any adhesive that squeezes through joints. Hardened mortar in the joint complicates grouting.
Tip: For heavier tile (e.g., stone or larger porcelain), you may use a “back-buttering” technique—applying a thin layer of adhesive on the tile back for extra bond strength.
Cutting Tiles Around Outlets and Fixtures
Part of your backsplash often wraps around electrical outlets, switch plates, or plumbing fixtures. Common cutting strategies:
Snap Tile Cutter: Good for straight lines. Score, then snap. Not ideal for angles or small notches.
Wet Saw: Cuts through most tile materials smoothly, especially for curved or L-shaped cuts around outlets.
Tile Nippers: Great for nibbling small arcs or notches in the tile edge. Can leave ragged edges but often hidden behind the outlet cover.
Hole Saw: If you need a round opening (rare for backsplashes but possible), a diamond-tipped hole saw does the trick.
Always measure carefully: Outlets can shift if you push them. Some might require “box extenders” after tiling to keep the switch plate flush with the new tile surface.
Grouting and Finishing Touches
Once the adhesive sets (often 24 hours, but check product instructions), you can move on to grout:
1. Choose Grout Wisely
Sanded: For joints 1/8” or wider. Contains fine sand that prevents shrinking.
Unsanded: For narrow joints or delicate tiles (glass, polished marble). Minimizes scratches.
Epoxy Grout: More resistant to staining and water infiltration, but mixing and cleanup can be trickier.
2. Apply Grout
Use a rubber grout float, pressing it diagonally across the joints so grout fully packs in. Work in small areas to avoid letting grout harden prematurely on tile faces.
Wipe off excess with the float at ~45° angles to the joints.
3. Sponge Cleanup
After letting the grout “set” briefly (often 10–20 minutes), use a damp (not sopping) sponge to wipe away residue. Rinse the sponge often.
Resist pressing too hard or you’ll pull grout from joints. Circular or diagonal motions help keep lines neat.
4. Haze Removal
Once the grout firms up further, a slight hazy film can remain. A clean, soft cloth or haze remover can buff it off. Some projects might require a second pass to ensure the tile surface gleams.
5. Sealing
Many grouts benefit from a sealer that prevents stains, especially in kitchens where sauce splashes or oils are common. Wait the recommended curing time, typically a few days, then apply a grout sealer if it’s not already “pre-sealed” or epoxy-based.
Natural stone tiles often need sealing on the tile surface, not just the grout, before or after grouting.
Special Cases: Corners, Stove Backs, and Moisture Exposure
Backsplashes often curve around corners or extend behind stoves (subject to heat) or sinks (subject to water splashes). Consider:
Corners: If two tiled walls meet, you might overlap tile edges or use corner trim profiles. The same approach could apply to windows or edges near cabinetry.
Behind Range or Stove: Ensure your chosen tiles tolerate higher temperatures, especially if using a gas range. Keep adhesives or mastics rated for heat.
High-Moisture Zones: For areas near sinks or dishwashers with frequent splashing, confirm the substrate is moisture-resistant (e.g., cement board or water-resistant drywall). Sealing your grout lines matters even more to prevent infiltration.
Maintenance Advice for a Long-Lasting Backsplash
1. Gentle Cleansers
Daily wiping with mild soap or specialized tile cleaner keeps surfaces free of grease. Avoid abrasive scouring pads that can scratch the grout or tile glaze.
2. Resealing Grout
If you used a standard cement-based grout, a quick reseal every 1–2 years helps repel spills. Check your bottle’s instructions—some sealers last longer.
3. Immediate Stain Cleanup
Acidic substances like tomato sauce or lemon juice can stain unsealed grout. Blot them promptly, preventing discoloration.
4. Inspect for Loose or Cracked Tiles
If a tile cracks—maybe from accidental impact—replace it before moisture seeps behind. If multiple tiles or a wide area seems compromised, a more thorough repair or reinstallation might be needed.
Common Pitfalls and How to Avoid Them
Skipping Proper Surface Prep: Tiling over grease, flaking paint, or unpatched drywall leads to poor adhesion and eventual tile failure. A thorough cleaning and smoothing is mandatory.
Rushing Adhesive Dry Times: If you grout before thin-set cures, tiles can shift or produce hollow spots. Follow the product’s recommended wait.
Inconsistent Spacing: Even small alignment shifts each row can become glaring after several courses. Use spacers and a level frequently to keep lines crisp.
Mishandling Grout Cleanup: Letting grout residue fully dry on tile faces requires heavy scrubbing or chemical haze removers. Periodic sponging saves headaches later.
Forgetting Edges and Transitions: A carefully laid field of tiles might still look off if the perimeter transitions (near countertops, cabinets, or windowsills) aren’t neat. Trim profiles or caulk can provide a clean finish.
Example Scenario: Updating a 3×6 Subway Tile Backsplash
To illustrate the process:
Surface Prep: The old laminate backsplash is removed, revealing intact drywall. After patching small dings, the area is wiped with a degreaser.
Layout: The homeowner chooses a classic half-stagger pattern. They measure carefully, starting at a focal center behind the stove, ensuring cut tiles end up near corners.
Adhesive Application: A 3/16-inch V-notch trowel is used, applying tile mastic in small sections. Each tile gets pressed firmly with 1/16-inch spacers.
Cutting Around Outlets: The homeowner uses a simple tile cutter for straight edges, plus nippers for small notches where outlets intrude.
Grout and Clean: After letting the tiles sit overnight, a white unsanded grout is applied. Sponging away excess haze and sealing the grout finalize a crisp look.
Finished Result: A uniform, bright backsplash that visually expands the kitchen while protecting walls. The entire job took a few days, but the transformation is substantial.
When to Call a Pro
A straightforward backsplash is typically within the abilities of anyone patient and detail-oriented. However, certain conditions may complicate the job:
Extensive Wall Damage: If removing old tile tears up the drywall or reveals mold, patching might become a bigger project.
Intricate Patterns or Large Format Tiles: Glass mosaics or big tiles often need specialized saws, adhesives, and experience to avoid lippage or breakage.
Structural Modifications: If walls require shoring or new framing, or if you plan to add accent lighting behind the tile, advanced carpentry or electrical steps might surpass casual DIY scope.
Hard Deadline or High-Value Home: If you can’t afford to experiment or prefer guaranteed results, a licensed professional ensures speed and quality.
SuperTech Industries is ready to tackle complex tile layouts, fix hidden substrate issues, or handle entire kitchen remodels. Our motto, “Simple Solutions. Superior Results.”, means you get professional craftsmanship that stands the test of time.
Wrapping Up: A Fresh Look with Lasting Benefits
Installing or updating a kitchen backsplash can be a rewarding DIY project—one that yields a transformative impact on the room’s overall ambiance. Armed with the right tools, careful preparation, and a methodical process, it’s quite feasible to create a robust, stylish surface. Pay attention to small details like alignment, transitions near outlets, and thorough cleanup to achieve a professional finish. And remember, if the job escalates or you want that polished look guaranteed, SuperTech Industries offers the skilled support and guidance to complete your tiling adventure with confidence.
SuperTech Industries
Your trusted partner for all your solutions.
KNOWLEDGEABLE - AFFORDABLE - ADAPTABLE - DEPENDABLE
© 2024. All rights reserved.
1530 E Williams Field Road
Ste. 201
Gilbert, AZ 85295


ROC 361165
Licensed - Bonded - insured